Running is one of the most popular forms of exercise in the world. However, up to 50% of all runners will sustain an injury that will impact their training or running performance. Long-distance running imposes highly repetitive forces, which can be up to eight times the body weight of the runner. A marathon runner takes an average of 25,000 steps during a race. You can only imagine how much total load is imparted on the body!
Injuries are sometimes just unavoidable. Even when you have done things correctly, it is the number of repetitions that is responsible for the development of an injury. Four of the most common running injuries are anterior knee pain, iliotibial-band syndrome, Achilles tendinopathy, and plantar-fasciitis. Whether it’s your knee, ankle, or hip, you need to follow a systematic return to running to ensure that you’ve built up the adequate strength to run. Returning to running after an injury without a plan puts your body at increased risk of future re-injury! Follow these easy steps and you’ll be back to running in no time!
1. Address Scar Tissue
After an injury the soft-tissues (muscle, tendons, ligaments, joint capsule, etc.) will quickly begin to start healing. However, this healing processes can be derailed. If the healing process has not been given enough time, if there is a lack of blood flow to the injured tissues, or if the affected area has been injured many times previously, scar tissue formation will occur. Scar tissue will restrict movement, create pain, and reduce athletic performance. If it is not addressed, a full recovery could be allusive.
You can address scar tissue on your own with a few simple steps. Rest, good nutrition, and ice are well known in their ability to reduce scar tissue formation immediately following an injury. Foam rolling and even yoga can help to reduce scar tissue in the sub-acute phase of injury. Be careful not to overdo the foam rolling as you can easily irritate the injured tissue and prolong the healing time.
If the injury has become chronic (longer than eight weeks) or has recurred several times, professional help may be needed. The gold-standard treatment for soft-tissue injuries is Active Release Technique®. This patented technique is useful to break down the scar tissue and allow for complete healing of the injured area. The technique is widely used by professional athletes around the world. You can find more information on our blog about Active Release and how it can help endurance athletes.
2. Start Back Slowly
When it comes to getting back to running, it’s all about gradually applying the load and stresses to your body in a systematic manner. This is called graded exposure. By applying load/stress in a graded way, you not only give time for your body (and brain) to adapt to the demands, but you also allow yourself to objectively determine how much running you can actually handle. For instance, if the goal is to get back to running a 10k, it’s most advisable to start with a smaller run, something like a 1k run would be perfect. Run that a few times and get used to it, and then slowly increase your mileage from there. For someone returning to running for the first time after surgery or big injury, it may be advisable to start with even smaller increments or use walk/run intervals for several training sessions.
Remember, your brain will try to trick you and tell you you’re ready for more vigorous workouts well before your body is ready. Just as you might think you can dance well in your head, often your body will show you something different!
3. Monitor Soreness
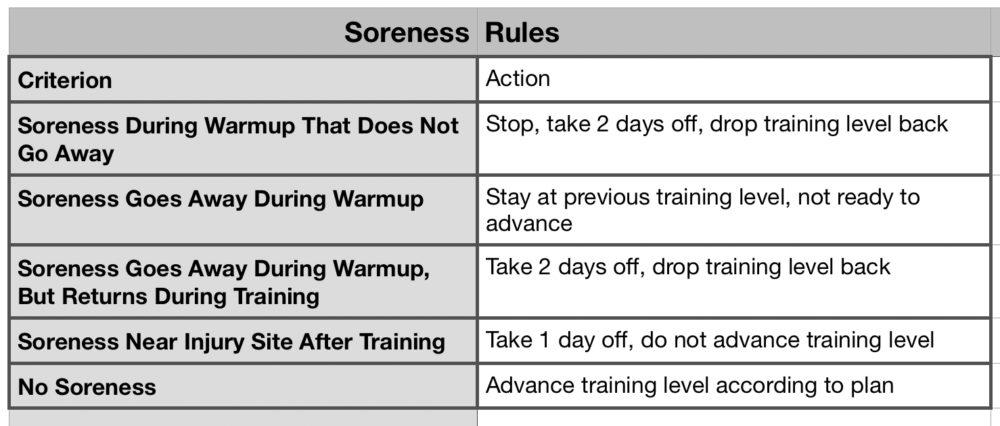
Listening to your body during your recovery is essential to coming back from an injury successfully. What is harmful and what is just running soreness can sometimes be difficult to decipher. When coupled with the pressure of being on a particular running schedule before the next race, runners frequently ignore their body and re-injure themselves. Follow this training rubric to know how and when to advance your running program.
4. Strength Training for Runners
If you are having difficulty advancing your running program and getting back your old self, you need to consider strength training. Strength training for runners is absolutely imperative to reduce the risk of injury and to increase speed, distance, or running intensity (hills, trails, sand, etc.). While almost any exercise is better than none, we’ll highlight some of our favorite strength-training exercises for novice and advanced runners alike.
Posterior Step Down
Step downs:
Step downs are a staple in my lower-extremity rehab progressions and for good reason. You can isolate/bias one leg without any “cheating” using the other leg like on squats, deadlifts, or lunge variations. Furthermore, depending on which direction the step down is (i.e. forward, sideways, backwards), you can preferentially bias either the glutes or the quads or work around mobility constraints like ankle dorsiflexion.
If you want to:
A. target the hip, go with lateral or posterior step downs.
B. target the knee, go with anterior step downs.
Lateral Step Down
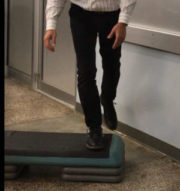
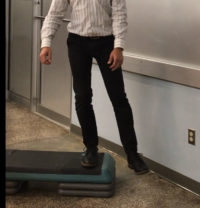
Posterior step downs:
With knee and hip patients, I will typically start with posterior step downs, as the demand is less on the knee and more on the hip. The trunk will flex forward naturally to keep your center of mass on the stair, thus utilizing the glutes/hip more in addition to shortening the lever arm on the knee.
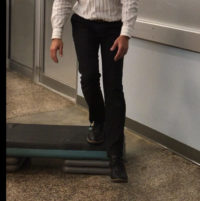
Lateral step downs:
Due to the step down occurring more in the frontal plane than the sagittal plane, this exercise will place more demand on the lateral hip muscles. The big keys here are to ensure your hips stay level and do no drop. Imagine wearing a belt and keeping it straight the entire time. Furthermore, do not reach to the ground. Lower yourself.
Anterior Step Down
Anterior step downs:
The trunk has to stay more upright with anterior step downs. This helps keep the center of mass on the stair. Anterior step downs do produce more anterior knee translation as well as ankle dorsiflexion and can irritate patellar tendonitis or Achilles tendonitis. If this happens make sure you address the potential scar tissue in the quad and gastroc/soleus muscles. If pain persists go back to posterior or lateral step downs to avoid further injury.
This is a more advanced progression for knee patients. And YES, I want the knee to translate forward past the toes here as we need to build tissue resilience and load tolerance. For someone with ankle mobility deficits, I often program in anterior reaches (i.e. an anterior step down) to load the ankle into dorsiflexion after mobilizing it.
Hip Extensions
Quadruped hip kicks:
Let’s face it, there are a TON of exercises for the core. A lot of them would likely help with trunk and pelvis stability, but these three have specific implications for runners. Runners should perform core exercises that target hip abduction and external rotation to help resist aberrant knee tracking. There is a tendency for the hip and knee to collapse into adduction and internal rotation as the hip flexes during weight bearing. This occurs at impact when a runner becomes fatigued, as the glutes can no longer stabilize the hip.

Donkey Kicks
Here are three core exercises that target the gluteus in a quadruped position. Place a therapy band around the upper thigh for resistance. Make sure to maintain a neutral spine, not allowing for rounding of the low back or upper thoracic spine. You want to pattern proper spinal stability while exercising the hips.
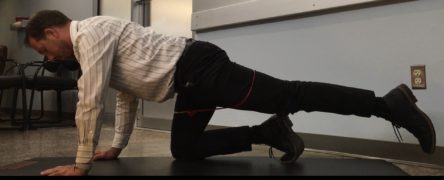
Hip extensions:
From the quadruped position, slide the leg low along the floor to full hip extension. Repeat for several repetitions before switching sides.
Fire Hydrants
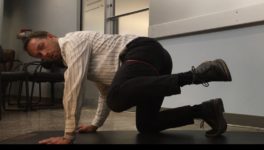
Donkey kicks:
From the quadruped position, kick the foot straight to the ceiling. Making sure to maintain neutral positioning in the lumbar spine, avoid hyperextension. Repeat for several repetitions before switching sides.
Fire hydrants:
From the quadruped position, abduct the hip as high as you can without excessive lumbar rotation. Complete several repetitions before switching sides.
Try bunching these three exercises back-to-back and doing multiple sets for time to build endurance. Once these exercises get easy, you can progress to upright standing exercises targeting the glutes.
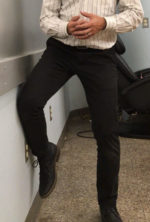 The Glute Medius wall lean:
This will mimic the single-leg stance required for functional movements such as walking, ambulating on stairs, or running. For this exercise first start with your feet about hip-width apart. With your knee closest to the wall, elevate and push your knee into the wall so that your hip is NOT touching the wall. AVOID leaning over towards your stance limb. This is tricky because, at the same time, you want to AVOID allowing your shoulder to touch the wall. Basically, allow your trunk to remain in the neutral position you would be in if you were to stand. The further you walk out your stance leg, the more difficult this exercise will get. Although you are also strengthening the leg that is pushing up against the wall, the stance limb is the one that should fatigue first. Go ahead and try this out. It is much more difficult than it looks!
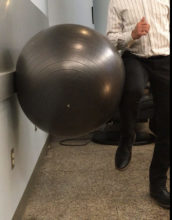 Advanced stork:
Use as small of a swissball as possible. I even like to use a soccer ball. Place the swissball against the wall, and place your distal thigh/knee against it, NOT your hip. DO NOT LEAN your entire body weight into the wall. Let your pelvis drop by rolling the swissball down. Then contract and FIRE YOUR GLUTES on your STANCE leg on the ground, driving your PELVIS up and rolling the swissball toward the sky. The motion that should be occurring should be your pelvis rocking side to side in the frontal plane. Hold for an isometric contraction for a few seconds before repeating. The stronger/more you fire your glutes, the harder the exercise becomes, so don’t go easy on yourself!
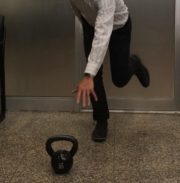 One-leg deadlift:
Stand on one leg with a kettlebell or dumbbell on the floor. Place the weight across midline and 18 inches in front of you. From the one-leg standing position, slowly bend at the hip and pick up the weight, keeping the back straight at all times. Avoid placing the raised leg back on the ground, if possible. Place the weight back to its starting position on the floor. Repeat for several repetitions before switching sides.
For more instruction on these exercises, checkout our Hip Stabilization Video on our YouTube channel.
Nutritional Corner
- Turmeric/Curcumin: Reduces pain and inflammation after injury, can help to reduce scar tissue formation.
- L-Glutamine: Amino acid important for repairing muscle tissue after injury, can reduce muscle soreness.
- CBD Oil: Can be taken internally as a systemic anti-inflammatory or can be found in a topical cream to reduce pain and inflammation.
If you are struggling to get back to running after a hip, knee, or foot injury, you are not alone. Sometimes it can feel that these problems will never be right again. But before you hang up your running shoes for good, before the doctor says you have to quit, try actively fixing the problem. If you are in need of professional guidance, give our office a call. We would love to help you reach your goals this year.
Free “Get Back to Running” Class
If you’d like further instruction on returning to running, come out to our free “Get Back to Running” class at Fleet Feet Sports in Roanoke February 13 at 7:00pm. Click here to register. Then use the Facebook event to invite your friends and family members.

Daryl C. Rich, DC, CSCS, ART®